https://www.youtube.com/watch?v=eOE7CAfQ7QU
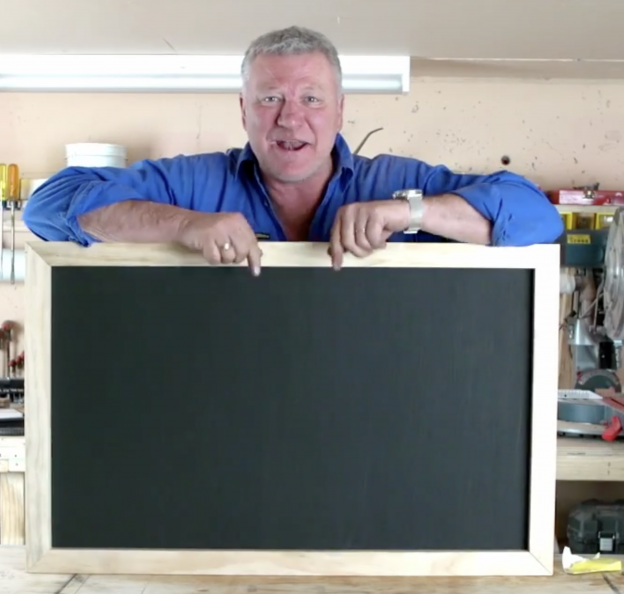
You know when you’ve gotta leave a message for someone at home and you cant find paper or a pen?
Check out this how-to video to make yourself a little blackboard for all the family to use. It's ... [read more]
https://youtu.be/8iee3OCNHTg
Here is a great idea to keep your magazines tidy and in order. Take a look at this how-to video of creating this easy magazine wall display.
The pictures below also show how simple it is to create this timber fram ... [read more]
I always wanted a wall of books in one room, like a library room. So down to the workshop to knock them up. Veneered board with hardwood trim. A two tone bookshelf. I like them.
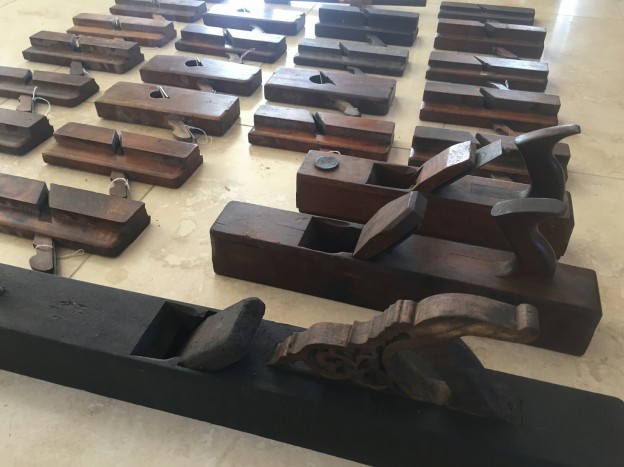
Old carpentry tools have been a passion of mine for years. This is a full set of hand moulding planes that I am planning to put on display in a touchy feely artwork at the farm.
[scotty_sign]
[display-posts id='1802,1741' title='Relate ... [read more]
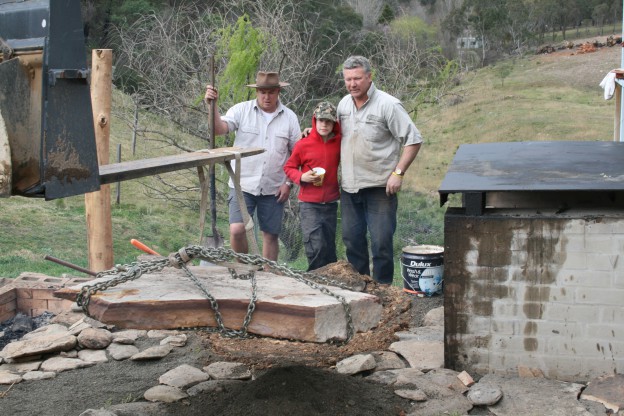
Nothing like getting free materials from the bush. The whole family got together. We got about 4 ute loads of reasonably flat river stones and bush rock and together as a team we paved the BBQ area with natural stone. It looks sensational.
... [read more]
You know when you’ve gotta leave a message for someone at home and you cant find paper or a pen?
Check out this how-to video to make yourself a little blackboard for all the family to use. It’s perfect for the kitchen where everyone can write their messages and a great idea for your shopping lists too.
Have a look at the photos below how easy it is to create this timber framed message board.
Step 1: Paint
First, you’ll need a 565mm by 900mm MDF board. Then you can paint your MDF board with blackboard paint. You can leave it to dry while you knock up your timber frame.
Step 2: Measure the timber lengths
You can now cut your lengths of timber. I’ve used a drop saw. The timber frame needs to go on the face of the blackboard, so therefore you want your frame to be slightly bigger than your board. So the outside of the frame should measure 575mm by 910mm.
Step 3: Cut the timber
I’m using mitre joints, which are quite difficult if you don’t have a drop saw. You could also use a mitre box or butt joint your joints if you aren’t confident.
Step 4: Line up the lengths of timber
You should have two long bits and two short bits to make up your frame. It’s important that all four pieces are exactly the same in length to the half mill, so you don’t throw your dimensions out.
Step 5: Sit the blackboard in the frame
You can then nail the frame to the bench to hold it in position, then place the blackboard over the top of the frame, about 5mm from each edge. Now you can screw the blackboard to the frame, and you have a blackboard for the kitchen where everyone can leave their messages.
https://www.youtube.com/watch?v=LEnUN-yoj84
Do you have lots of photos sitting in a draw? Why not let your family and friends enjoy some of these memories?
Watch this how-to video to make some simple and creative photo holders that you can us ... [read more]
https://youtu.be/8iee3OCNHTg
Here is a great idea to keep your magazines tidy and in order. Take a look at this how-to video of creating this easy magazine wall display.
The pictures below also show how simple it is to create this timber fram ... [read more]
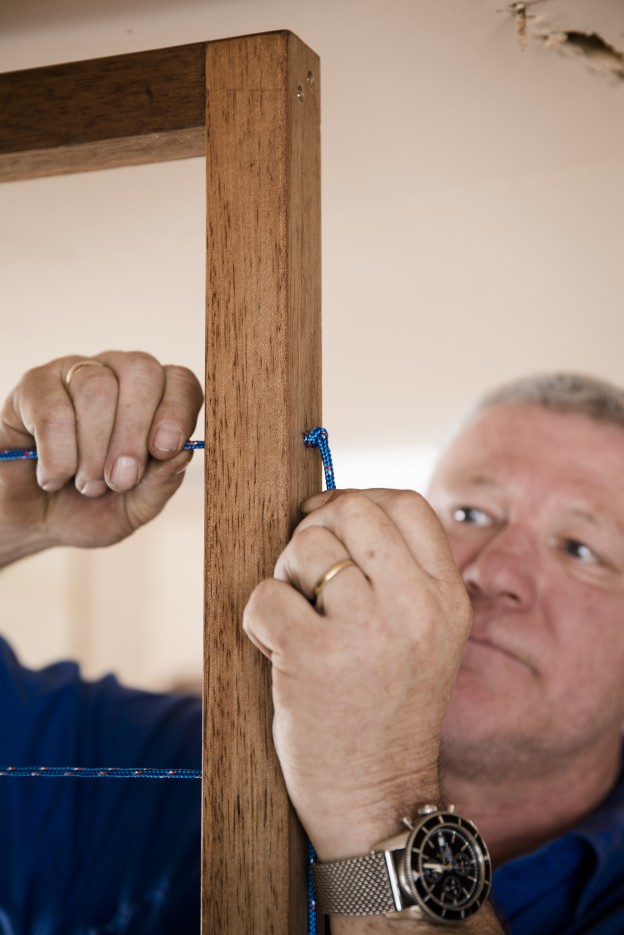
Here is a great idea to keep your magazines tidy and in order. Take a look at this how-to video of creating this easy magazine wall display.
The pictures below also show how simple it is to create this timber frame and then to add the rope – drill, thread, knot and its ready to go.
Step 1: Measure and mark
\
Measure and mark 600mm (or find the centre) on one 1.2m timber length.
Step 2: Cut the timber
Cut the timber using a drop saw (a handsaw will also get the job done). This will give you two 600mm lengths – these will be the top and bottom of the frame. Measure and mark the thickness of the timber on both ends of the second 1.2m length. This will make sure you don’t go too close to the edges when drilling. Repeat process on second 1.2m length.
Step 3: Find the centre and drill
Find the centre of the traced-out square on one end of the 1.2m timber and use a drill and drill bit to make two holes on either side of the centre point, about 1cm apart. Repeat on all four ends. Make sure the holes are slightly bigger than the screw, so the screw has room to move.
Step 4: Form the frame
Clamp bottom timber (600mm length) on table. Insert screws into the 1.2m-timber holes and align timber and screws on the side of the 600mm length, creating a corner, and screw in place. Repeat process on all four sides, forming a frame. Sand frame well and give it a stain. Leave to dry.
Step 5: Measure and mark
Measure and mark 150mm in one of the 1.2m sides, starting from the corner. Then from the first 150mm mark, measure and mark another 150mm space this process until you have six marks and a 150mm space between each. Repeat process on the other 1.2m side.
Step 6: Measure and mark
Measure and mark 21mm in at each 150mm point using a combination square. This will give you the exact centre point, so you drill in the centre of the timber.
Step 7: Drill the holes
Using a drill and a drill bit that is slightly bigger than the rope, drill holes going all the way through each mark. You should now have 12 holes, six on either side.
Step 8: Thread the rope
Thread the rope through the holes, cut off excess rope and tie a knot on the ends, making sure the rope is as tight as possible so the string stays in place.
https://www.youtube.com/watch?v=eOE7CAfQ7QU
You know when you’ve gotta leave a message for someone at home and you cant find paper or a pen?
Check out this how-to video to make yourself a little blackboard for all the family to use. It's ... [read more]
https://www.youtube.com/watch?v=Exh6v5Gr5hU
These art boards are a great way to show off your kid’s art work and knowing how many masterpieces come home each week from school, its also an easy way to update the displays.
Have a look at the ... [read more]
These art boards are a great way to show off your kid’s art work and knowing how many masterpieces come home each week from school, its also an easy way to update the displays.
Have a look at the how- to video and the pictures below, to check out the easy instructions, including a safety tip when using power tools.
Step 1: Position A4 paper
Position A4 sheet and bulldog clip on top of the timber.
Step 2: Mark out the border
Use a pencil and ruler to create a border around the sheet. I did 280mm across and 370mm down to create an equal border.
Step 3: Cut the timber
Cut the timber to size using a drop saw or handsaw.
Step 4: Shape the edges
Use a hand planer to shape the edges of the timber. This will create a smoother and cleaner look while also making the sanding process easier. The best way to plane timber is by starting with the side grain (two longer sides), then across the end grain (top and bottom) to ensure the ends don’t split.
Step 5: Sand the timber
Sand the timber well for a much smoother finish.
Step 6: Stain the timber
Use a cloth to stain the timber. Latex gloves are essential to avoid staining your hands. Leave to dry.
Step 7: Mark the drill point for the bulldog clip
Position A4 sheet and clip onto the timber. Measure halfway across the top of the timber and find the centre point. With a 285mm top the middle point sits at 142.5mm. Place bulldog clip on the 142.5mm point, bringing it 1cm down from the top.
Step 8: Screw the bulldog clip
Screw bulldog clip in place using a drill and clip in the artwork.
https://youtu.be/8iee3OCNHTg
Here is a great idea to keep your magazines tidy and in order. Take a look at this how-to video of creating this easy magazine wall display.
The pictures below also show how simple it is to create this timber fram ... [read more]
https://www.youtube.com/watch?v=u8rgQEJNKzw
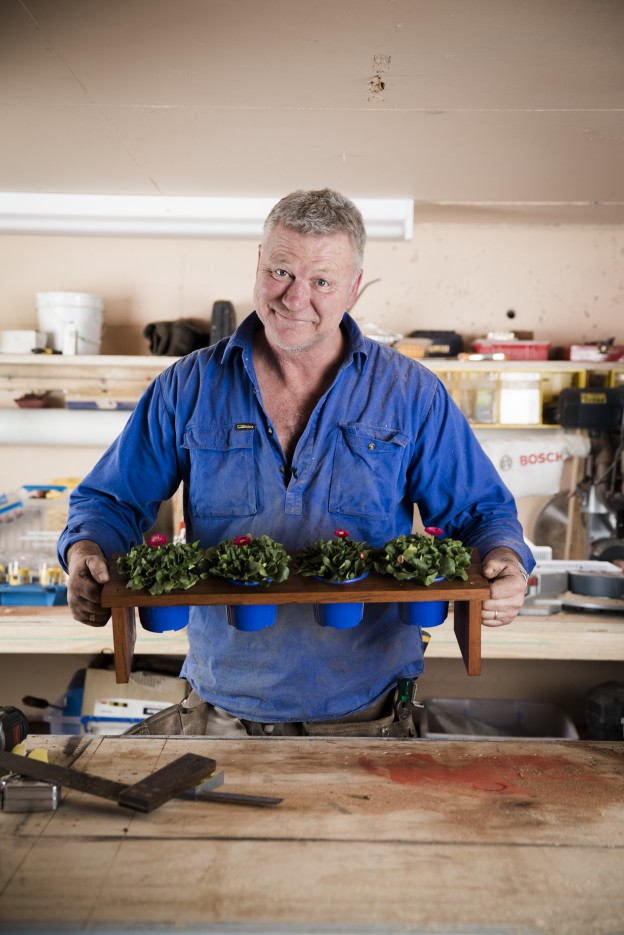
Do you want your kitchen window sill to look greener?
Then watch this how-to video to make the perfect shelf for your pots. This simple timber plant stand, for inside or outside, is just the thing for ... [read more]
Do you want your kitchen window sill to look greener?
Then watch this how-to video to make the perfect shelf for your pots. This simple timber plant stand, for inside or outside, is just the thing for your herbs or flowers.
Check out the photos below to see how easy it is to create this great stand that frames your pots.
Step 1: Measure and mark
Use your measuring tape and pencil to mark out where your round holes will be drilled in your length of timber. Choose a piece of wood that will fit well on your windowsill. My piece of timber is long, so I’m going to cut it in half and use the excess to make the legs. Make sure you measure out the spaces in between your holes evenly.
Step 2: Cut your holes
I’ve used a holesaw drill bit, which will come in handy for future projects if you decide to invest in one. I’ve measured the pots and picked a holesaw that matches the size of the pots to give them a perfect fit within the shelf.
Step 3: Sanding
Sand your timber down, then cut the two leg pieces from the wood using the drop saw.
Step four: Screw in the legs
Next you need to screw the top onto the legs. Drill down through the top into the legs and insert three screws on each side. The timber I’ve used is hardwood, so when you go to drill the legs on, it’s going to be tougher for the screws to countersink on the surface. Use a bigger drill bit to put a countersink hole at the top so the screw sits flush.
Step five: Staining
Give the legs a bit of a sand down to smooth the surface and get rid of any sharp or rough edges. Then, wearing gloves, wipe on the all-weather stain, so your shelf looks great and copes well with being outside.
https://www.youtube.com/watch?v=Exh6v5Gr5hU
These art boards are a great way to show off your kid’s art work and knowing how many masterpieces come home each week from school, its also an easy way to update the displays.
Have a look at the ... [read more]
https://youtu.be/12p2w0fVU3o
Creating Christmas decorations for the tree can be simple and fun. All you need is timber, a drill, paint and a rope.
Watch this how-to video and check out the pictures below on how to create this little Christmas ... [read more]
Creating Christmas decorations for the tree can be simple and fun. All you need is timber, a drill, paint and a rope.
Watch this how-to video and check out the pictures below on how to create this little Christmas house. Using this simple idea you can design and create a variety of decorations at this festive time.
Begin with length of timber (7cm x 4cm) Plus timber scraps to use as stamps; pencil; ruler; circular saw; drill; paintbrush; red paint; black paint; rope
Step 1: Mark the centre point
Place the timber on the table longways vertically. On the top edge, mark the centre point.
Step 2: The roof
To create the roof line, rule a diagonal line about 45° from the centre point to the right, towards the outside edge. Repeat on left side. The lines don’t have to be perfectly even – it’s better if your house is a bit rough looking.
Step 3: Circular saw
Use a circular saw to cut along the lines, creating the house shape. Now work out how big your house needs to be and mark the bottom line – about 7cm down from the roof line. Cut along that line with the saw.
Step 4: Drill a hole
You need to be able to hang your decoration, so drill a hole right through, near the roof peak.
Step 5: Paint
Paint the roof red.
Step 6: Windows and door
Use timber scraps to stamp the window and door. My window is a 1cm square and my door is about 1cm x 2cm. Dip the end of the small stamp into black paint then press onto the house in the window positions. Repeat with the other stamp to make the door shape.
Step 7: Rope
Thread rope through the hole. Tie a knot then trim excess length.
https://www.youtube.com/watch?v=u8rgQEJNKzw
Do you want your kitchen window sill to look greener?
Then watch this how-to video to make the perfect shelf for your pots. This simple timber plant stand, for inside or outside, is just the thing for ... [read more]
https://www.youtube.com/watch?v=mG8xV2PAkLw
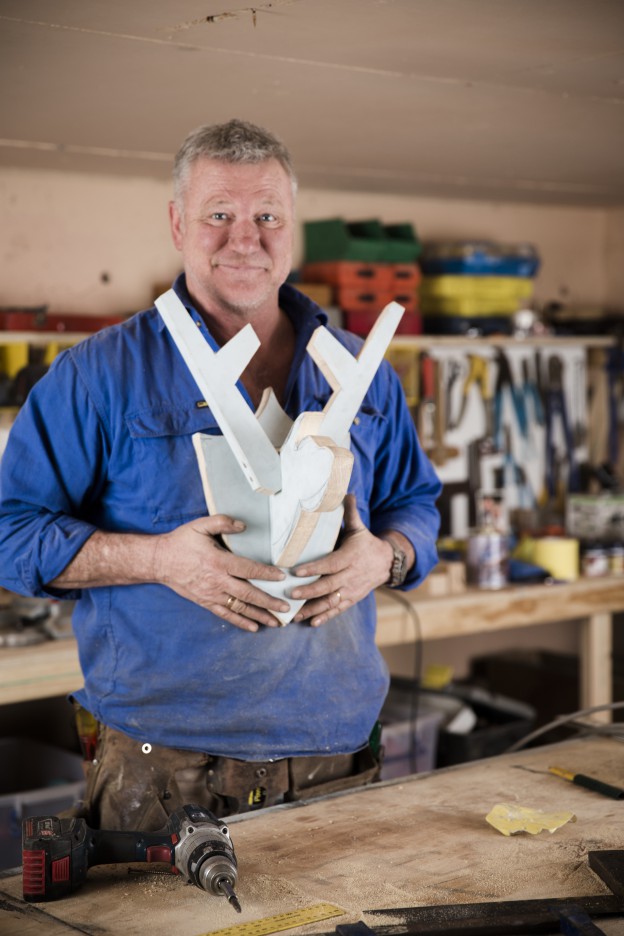
This is a chance to use your creative skills and have fun with designing your own deer head with antlers. It can have a modern or classical look or even a Christmas feel.
Check out the DIY instruction ... [read more]
This is a chance to use your creative skills and have fun with designing your own deer head with antlers. It can have a modern or classical look or even a Christmas feel.
Check out the DIY instruction on the video and the pictures below to see how simple it is to create your own wall mounted Deer Head.
https://youtu.be/12p2w0fVU3o
Creating Christmas decorations for the tree can be simple and fun. All you need is timber, a drill, paint and a rope.
Watch this how-to video and check out the pictures below on how to create this little Christmas ... [read more]
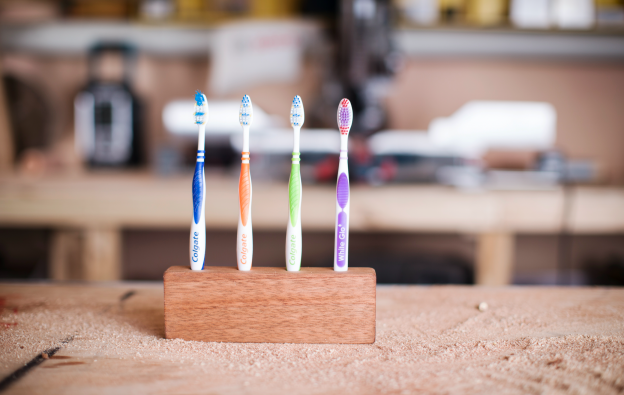
This DIY Toothbrush Holder is so easy to make - you can even get the kids involved.
Check out this how-to video to create your very own DIY Toothbrush Holder or have a look at the photos below see how easy it is to make this DIY Toothbrush Hol ... [read more]
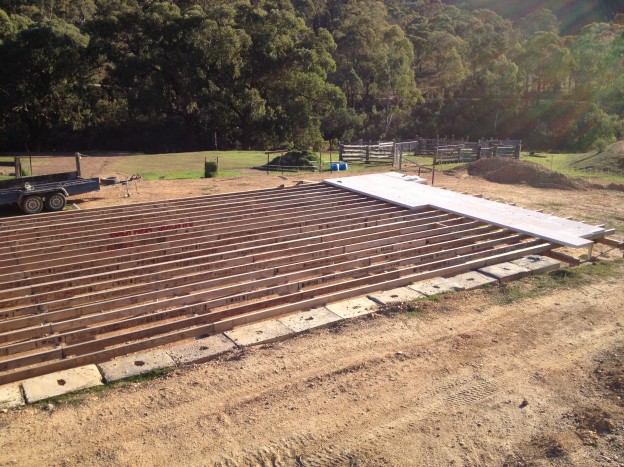
Here is another update on my project Follow the Build Part 5.
You would have read Follow the Build Part 4 where I was working on the floor frame. Well I’ve got to say, this is the ultimate in carpentry for me. The big ironbark timber (which you can see), have got that real pioneer building feel to it. It’s just what I love with 23 magnificent sticks of 300 x 300 ironbark. The cross member beams are at 6m long, perimeter beams at 4.5m and posts at 4m. The 6m beams weigh in about 2 tonnes so machinery is required to cut them. It’s too big for a circular saw so it’s a chain saw all the way.
First thing to do is to cut and stand the posts onto a concrete pier with a handmade stirrup prepared below the deck. The pier has a screw pier in the middle of it going down about 3m. So affectively the hardwood posts is secured 3m below the surface. These need to be secure as they are the structural basis of the entire lounge, dining and kitchen area.
The perimeter beams and cross member need to be cut precisely to slot into each other. This timber is expensive so measure 5 times and cut once and don’t stuff it up! Because the timber is so big and I’m using a chain saw I can have a tolerance of about 5 mls but of course trying to get it as good as possible is key. All the cross members and perimeter beams are all in contact with the top of the posts so all the load is not on just the brackets.
Last thing to do is bolt the whole thing off and the finished product looks spectacular.
Well that’s it for the moment folks. Keep following the build and let me know your thoughts via my Scotty Cam Facebook Page.
Won’t be long till the next update so stay tuned for part 6 coming very soon…
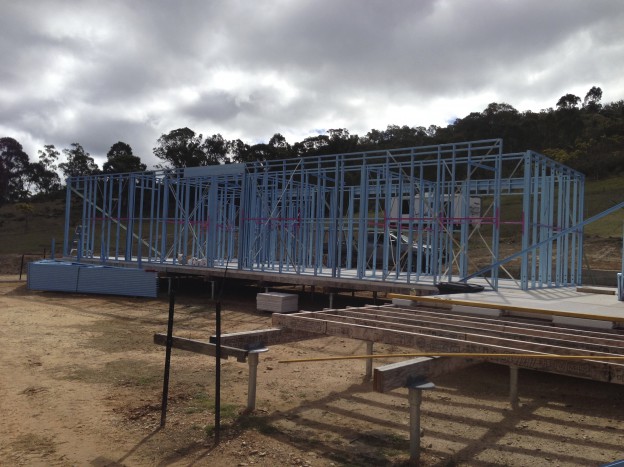
BLUESCOPE STEEL FRAMES FOR THE BEDROOMS
Here is another update on my project Follow the Build Part 6.
You would have read in Follow the Build Part 5 which was all about iron bark posts and beams.
Now I’ve always been a timber man when ... [read more]
FLOOR FRAME
I'm back with another instalment of Mudgee - Follow the Build Part 4. You would have read in Follow the Build Part 3 piers setout.
Whilst we're building the new house here at Mudgee, you would have seen the progress of my new b ... [read more]